How do you scan old photos with your phone?
Put the print flat in soft daylight, turn off the flash, hold the phone straight above it, and fill the frame with the photo. Take it out of any glass frame first, because glare can't be removed afterwards. A sharp, evenly lit phone shot is good enough to restore; a blurry or glare-covered one limits what any restore can do.
Why the scan matters
OldPics restores from what is in the scan. Scratches and stains on the print can be repaired. Blur from a shaky hand, a glare patch across a face, or a shadow from your phone are not damage on the photo, and the restore can't tell them apart from the real picture. Five minutes spent on the capture usually matters more than anything after it.
Step by step
- Find soft, indirect light. A table near a window on a bright day, out of direct sun, works well. Overhead room lights often throw your shadow onto the print.
- Turn off the flash. It creates a hot spot on glossy prints and flattens texture.
- Take the print out of the frame or album sleeve. Glass and plastic reflect the room. If a print is stuck to the glass, don't force it; shoot through the glass and tilt the frame slightly until the reflection moves off the image.
- Lay it flat. Put curled prints on a dark, matte surface. You can hold edges down with a couple of books placed off the image. Don't press on the surface.
- Clean the lens. Phone lenses pick up fingerprints that make everything look hazy. Wipe it with a soft cloth.
- Shoot straight on. Hold the phone parallel to the print, directly above the center. Angled shots make the photo keystone-shaped and blur the far edge.
- Fill the frame. Get as close as the camera can focus sharply, with a small margin around the print. Use the main (1x) lens rather than digital zoom.
- Tap to focus on a face and hold still. Take two or three shots and keep the sharpest.
- Turn off beauty, portrait and filter modes if your camera has them. Some phones also smooth or brighten automatically; if you can switch that off, do. You want the print as it is.
- Crop before upload. Trim the background. If the print sits on a card mount or has a handwritten caption you don't want, crop that off too. OldPics keeps the whole image you upload.
Glossy prints and glare
Glossy and silver-toned prints reflect light at any angle. If you see a white sheen, move the light, not the phone: turn the print so the window is to the side instead of behind you, or shade it with a sheet of card. Check the shot zoomed in before moving on.
Mounts and captions stay unless you crop them
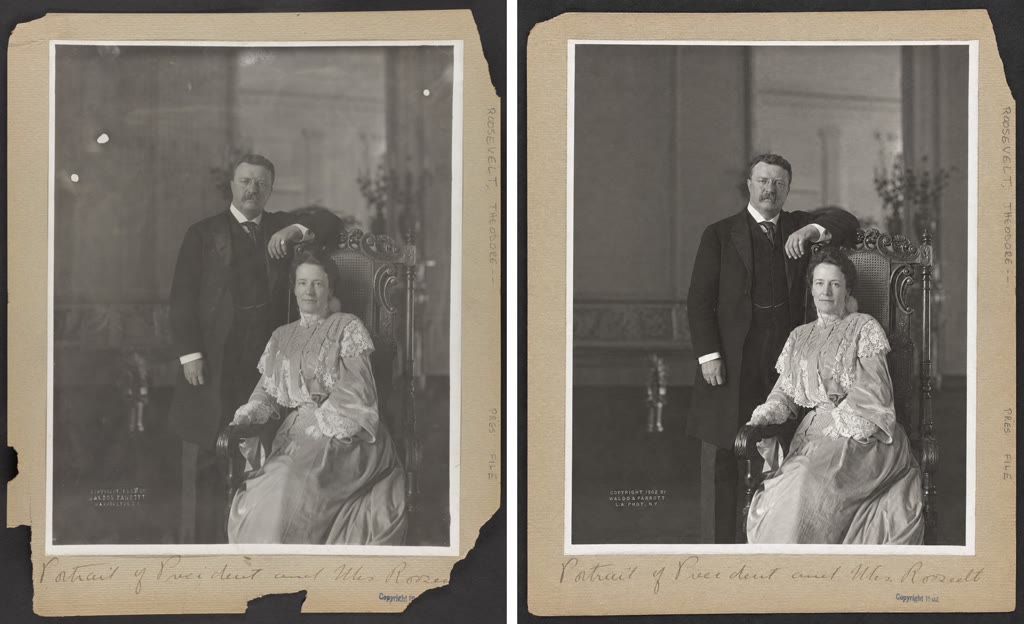
This scan includes the card mount, its torn corners and the handwritten caption. The restore cleaned up the photo and kept all of it, because it doesn't crop. That is right if you want the caption as a record. If you only want the picture, crop to the print edge before you upload.
Scanner apps
You don't need one, but they help with glare and straightening. Google's PhotoScan app is still listed on the App Store (iPhone) and Google Play as of September 2026. It takes several shots of the print and combines them to reduce glare, and crops and straightens automatically. Upload the saved scan to OldPics as usual.
A flatbed scanner is still better for small or valuable prints, and for batches. A phone is fine for most family photos.
FAQ
Is a phone photo good enough to restore?
Yes, if it is sharp, evenly lit and free of glare. Look at it zoomed in on a face before you upload.
Should I use my phone's built-in document scanner?
Document modes often raise contrast and flatten gray tones to make text readable, which throws away detail in a photo. Use the normal camera or a photo scanner app.
Can I restore a photo while it is still in the album?
You can, if the sleeve or film over it is removed or doesn't reflect. Shooting through a plastic sleeve usually adds glare and haze.
What file should I upload?
The original photo from your phone, cropped. Don't send it through a messaging app first; many compress images.
Scan it, then restore it at oldpics.ai. 5 free restores, no card needed.
Related guides
Last updated: 25 September 2026